Split Testing in ~50 lines of JavaScript
I tried to use a Matomo A/B testing plugin and it didn’t work, so I wrote my own: sometimes, re-inventing the wheel is the fastest way to get on the road.
I finally read The Lean Startup, and my main takeaway was that an entrepreneur who doesn’t use split testing is like a pilot who doesn’t use an altimeter: not likely to last long.
I was about to launch salez.ca, and was using the project as a test-case for the ideas in the book.
I use Matomo for privacy-respecting, self-hosted analytics. Matomo’s official A/B testing plugin is a paid add on, and it’s expensive: it alone would eat most of the profits from a microstartup like the one I was trying to build.
I spent the better part of two afternoons installing Nofrillsplugins’s free Simple A/B Testing plugin for Matomo, and trying to get it to work.
It may have been operator error, but it ran the test condition 100% of the time. I poked into the code to try to fix it, and then thought, wait, I don’t need a glossy interface for editing my A/B tests, why not just write something from scratch in JavaScript?!? How hard can it be?
As it turned out, not hard at all: I wrote it on the drive from a concert to the hotel, in the back seat of the car.
Here are the features I decided I needed:
- Support for multiple simultaneous split-tests
- An algorithm for choosing which variant to show
- A way to track “conversions” for different variants
- Include which variant was shown in Matomo data
- Add click tracking for call-to-action button(s)
- A way to always show the same variant to a user
- Stretch goal: support for more than two variants per test
- Stretch goal: Multi Armed Bandit algorithm (a subject for a future post)
The first thing I did was install a local, testing instance of Matomo. I already had three or four of these, but a fresh one never hurts. My production instance is pig slow – whether from the amount of data, or from the under-spec hosting – so this helps shorten the feedback loop and also means that I don’t pollute production split test results with hundreds of page refreshes on localhost.
To store the tests, I used the simplest thing that could work: a JavaScript object. The top level keys are the names of the tests. Right now, each test has a single method, .js(), which is a function with the JavaScript to change the page to that variant. (If you wanted to get fancy you could separate out the CSS into its own method.)
splitTests = {
    "pricing": {
        js: function () {
          // do something
        }
      },
      "call-to-action": {
        js: function () {
          // do something
        }
      },
      "social-proof": {
        js: function () {
          // do something
        }
      },
}
For v1. I chose a simple 50/50 split algorithm:
if (Math.random() > 0.5) {
  // run the variant
} else {
  // run the control
}
To track variants, I used Matomo Custom Dimensions:
_paq.push(['setCustomDimension', i, variantKey + "-" + variantCookie]);
Custom Dimensions need to be created in Matomo first. (Go to Settings Cog > Websites > Custom Dimensions and click “Configure a New Dimension”). I used 1, 2, and 3 for simplicity, so they can be re-used for future tests.
To track clicks, I could have used Matomo events and onclick handlers, but those are a pain to set up. So I used:
_paq.push(['trackVisibleContentImpressions']);
Along with the necessary data attributes:
<button data-track-content data-content-name="Submit Button" data-content-piece="Main CTA">Submit!</button>
It took me a bit to figure out how to use these. (Here are the docs.) I gather data-track-content is for the area to monitor. data-content-name is for something like the product name in an e-commerce setting, while data-content-piece is the element actually clicked. So for news site, data-content-name might be the name of the post, and data-content-piece might be the button clicked.
There’s also data-content-target, which I’m not using.
To make sure a given user is always shown the same variant after the first visit, I used localStorage:
variantCookie = localStorage.getItem(variantKey)
// The user is already part of a split test: act accordingly
if (variantCookie) {
  // set Matomo custom dimensions
  if (variantCookie == "1") {
    // run variant JS
  }
} else {
  // Assign new user to a variant
  if (Math.random() > 0.5) {
    // set Matomo custom dimension
    localStorage.setItem(variantKey, "1")
    // run variant JS
  } else {
    // set Matomo custom dimension
    localStorage.setItem(variantKey, "0")
    // "run control", ie, do nothing
  }
}
A note on order. It’s important that it goes like this:
var _paq = window._paq = window._paq || [];

// split testing code

// normal matomo tracking code, which normally has the _paq line at the start
That’s it.
Then, we just need to create custom segments, and compare the data we have gathered. You’ll probably want a control segment and a variant segment for each test.
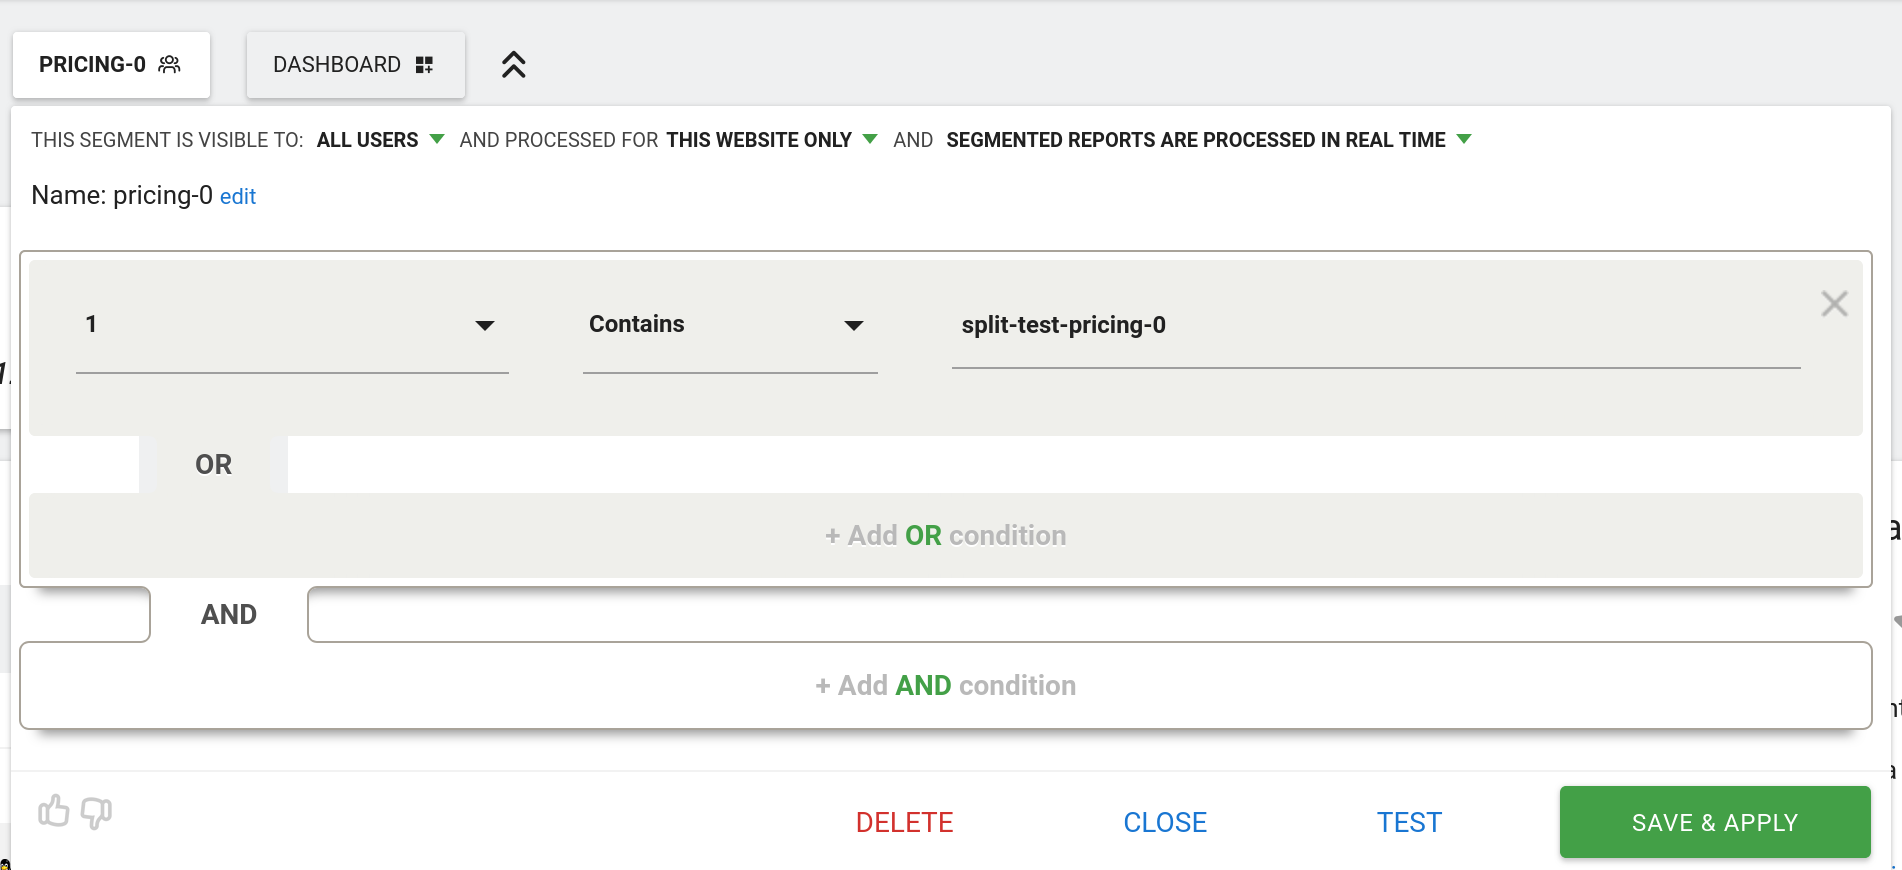
Click the segments menu (which by default says “All Visits”), and click “Add New Segment”.
For the left side of the equation, select the custom dimension you set for the test (in my case, 1) from the Visitors section of the dropdown. Set the comparator to “contains”. And in the value field, put split-test-TESTNAME-0 (replacing TESTNAME with the key you chose for the test).
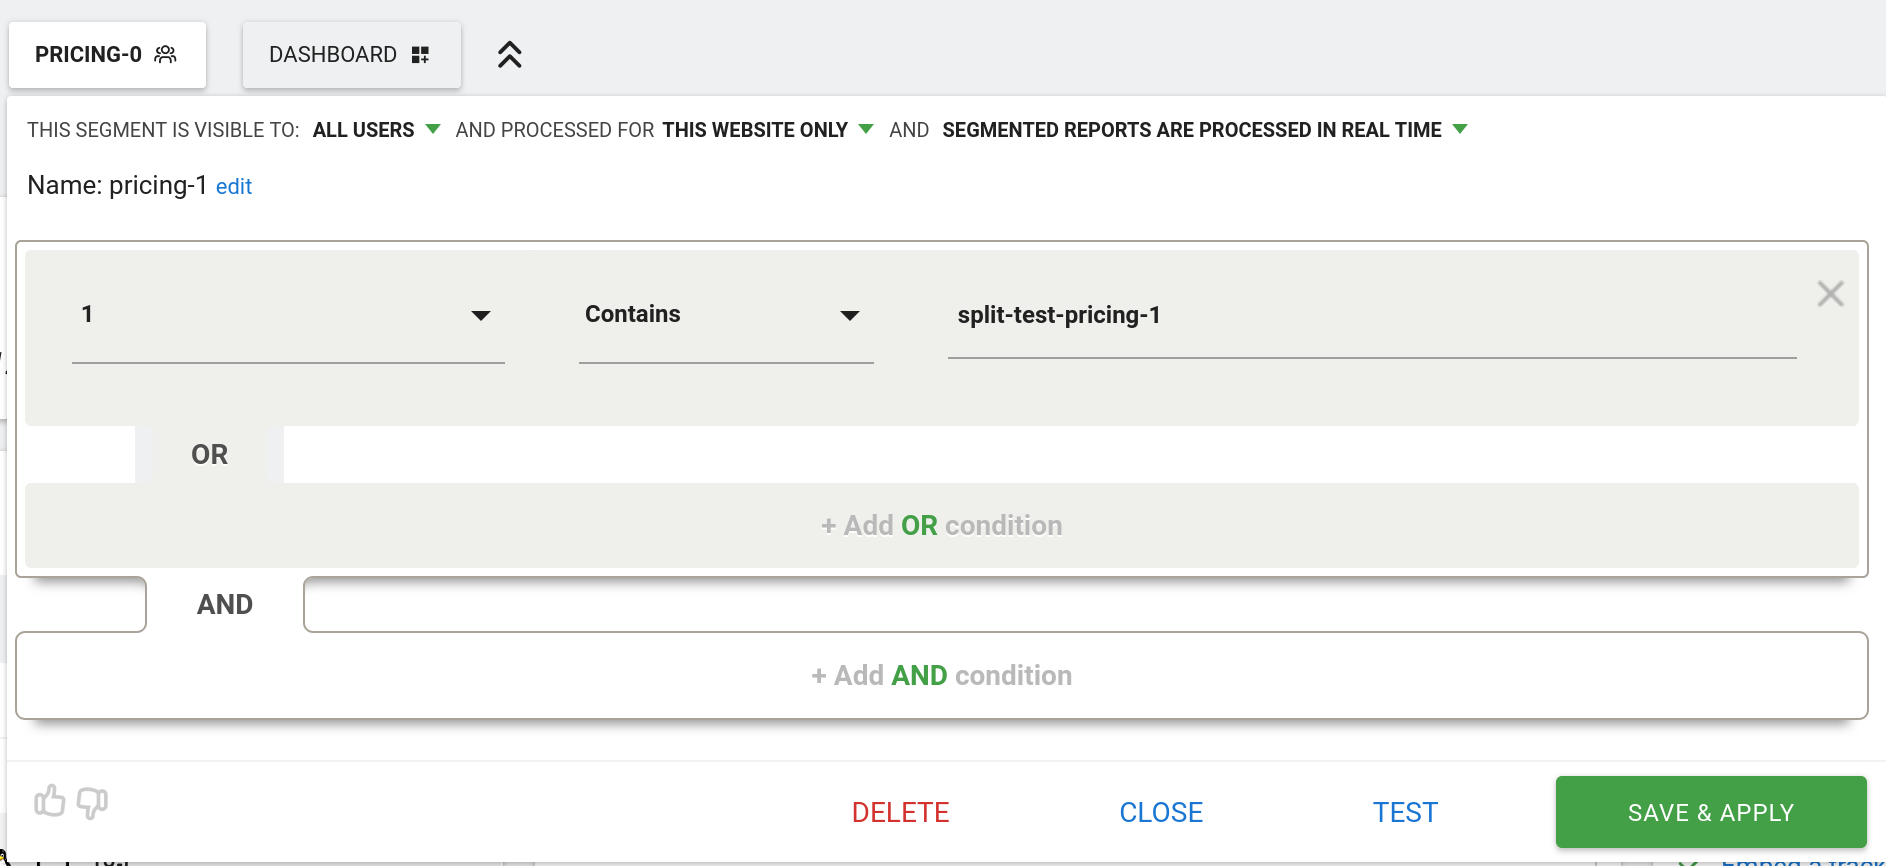
Now create a second segment, with the same parameters, except the value is split-test-TESTNAME-1.
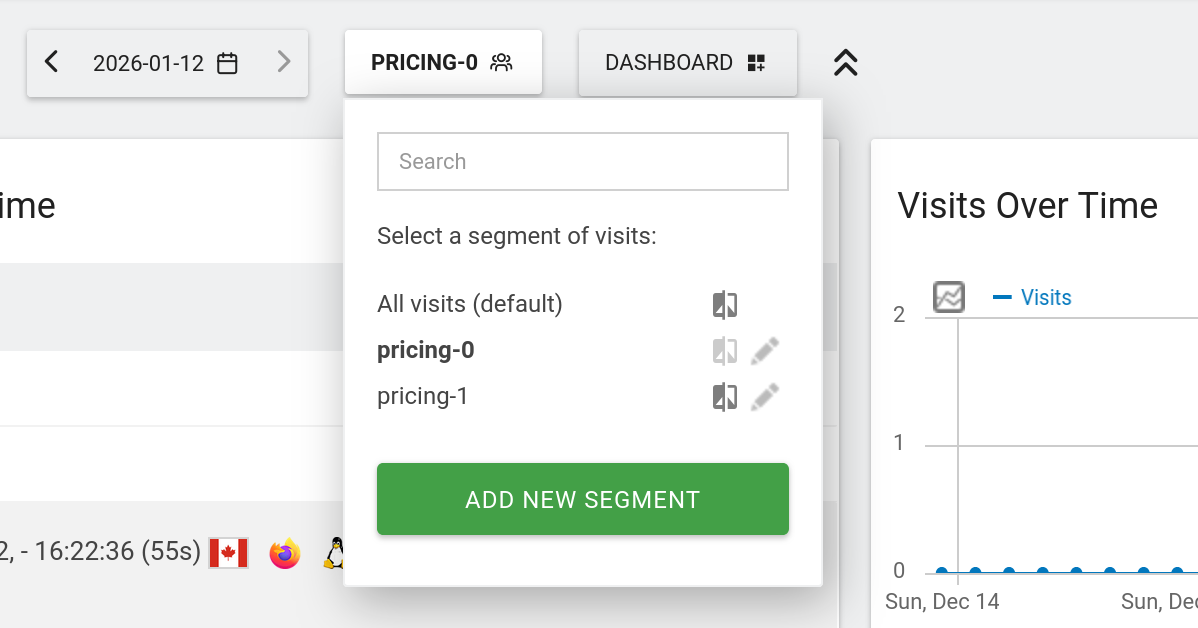
Now, get some data into Matomo for both variants. If you’re testing locally, you will need to delete or modify the variant cookie, since there’s only one user, and each user is always shown the same variant.
Then, select one or other variant from the segments menu, and then click the little compare icon next to the other variant:
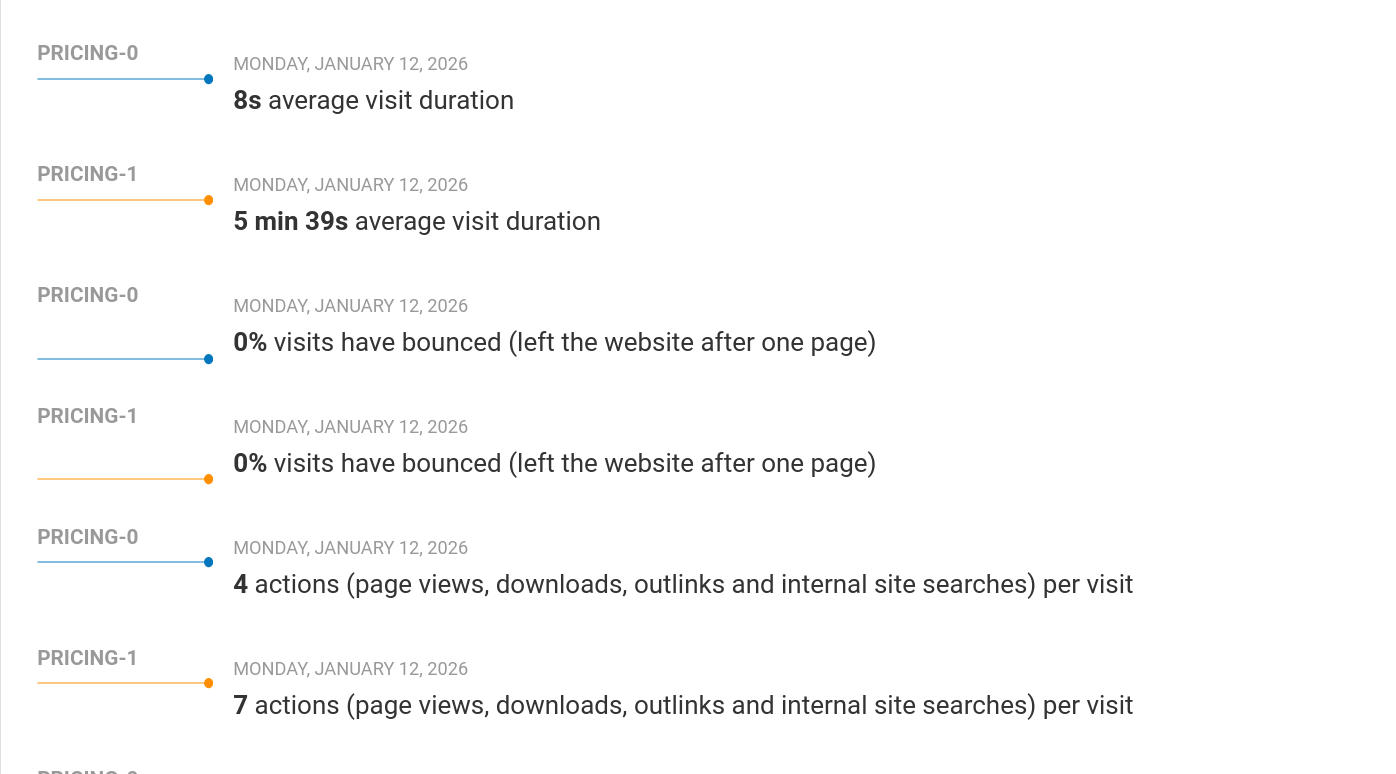
This will give you a glorious dashboard, where everything has two values, one for each variant! Exactly what we want:
Below is the full code. You will need to adjust what tests you’re running (and the JS for each test), as well as the placeholders YOURDOMAIN, YOURMATOMOURL, and YOURSITEID.
If you’re using Google Analytics / Plausible / Umami / GoatCounter / Fathom, most of the code will be the same, but the JS lines that set up custom dimensions and click tracking will need to be modified accordingly.
  <script>
    var _paq = window._paq = window._paq || [];
    splitTests = {
      "pricing": {
        js: function () {
          alert("pricing test condition run")
        }
      },
      "call-to-action": {
        js: function () {
          alert("call-to-action test conditon run")
        }
      },
      "social-proof": {
        js: function () {
          alert("social-proof test condition run")
        }
      },
    }

    for (let i = 0; i < Object.keys(splitTests).length; i++) {
      objectKey = Object.keys(splitTests)[i]
      //console.log(objectKey)
      //console.log(splitTests[objectKey])

      variantKey = "split-test-" + objectKey
      variantCookie = localStorage.getItem(variantKey)

      // The user is already part of a split test: act accordingly
      if (variantCookie) {
        _paq.push(['setCustomDimension', i + 1, variantKey + "-" + variantCookie]);
        if (variantCookie == "1") {
          splitTests[objectKey].js()
        }
      } else {
        // Assign new user to a variant
        if (Math.random() > 0.5) {
          // run the variant
          _paq.push(['setCustomDimension', i + 1, variantKey + "-" + 1]);
          localStorage.setItem(variantKey, "1")
          splitTests[objectKey].js()
        } else {
          // run the control
          _paq.push(['setCustomDimension', i + 1, variantKey + "-" + 0]);
          localStorage.setItem(variantKey, "0")
        }
      }
    }

    _paq.push(["setCookieDomain", "*.YOURDOMAIN"]);
    _paq.push(["disableCookies"]);
    _paq.push(['trackPageView']);
    _paq.push(['trackVisibleContentImpressions']);
    _paq.push(['enableLinkTracking']);
    (function () {
      var u = "//YOURMATOMOURL.COM/";
      _paq.push(['setTrackerUrl', u + 'matomo.php']);
      _paq.push(['setSiteId', 'YOURSITEID']);
      var d = document, g = d.createElement('script'), s = d.getElementsByTagName('script')[0];
      g.async = true; g.src = u + 'matomo.js'; s.parentNode.insertBefore(g, s);
    })();

  </script>